Lesson 3: Setting up an ocean farm
Introduction
The great thing about ocean farming is that farm designs are modular, scalable, and can be easily adapted to suit your site. Although most ocean farms have the same basic elements in common, every farm will look a little bit different, because every site and farmer are also unique.
Your farm design will be influenced by:
Site constraints
Recall all the environmental factors we discussed during the course about finding the right spot: current speed, wind and wave exposure, bottom type, bottom depth, etc. These factors will influence the type of gear required and the ultimate design of your farm.
Your business strategy
What do you plan to do with your crops when they come out of the water? How much do you need to produce to meet your business goals?
Your start-up budget
Be honest with yourself about the limitations of your budget and the type of system you can realistically afford to build.
Social context
Do you need to make compromises to accommodate members of your community, such as limiting surface buoys to minimize visual disruption or choosing gear that’s easy to remove in the summer months when recreational boating is high?
As you go through the farm design process, make sure to keep these guiding principles in mind; they should factor into every choice you make.
The farm design process is likely to be iterative. You might need to adjust your design throughout the start-up process based on feedback from your national permitting agency, availability of gear in your area, input from farmers in your area, etc. But in general, to start a farm, you’ll need to:
- Choose the array type (or types) you want to build.
- Determine how many arrays you’ll need to meet your production goals.
- Determine how large a site you’ll need to house your farm.
- Select the gear that will suit your site.
- Submit your farm plan for a lease and permit application.
When you’re first getting into ocean farming, there is a lot to figure out. Beyond the journey of finding and permitting your site, designing a farm, organizing seed, and identifying a market for your crop, there are two key questions to consider:
Do you like this type of work?
Do crops grow well on your chosen site?
Like with so many things in life, you can do your best to plan and predict, but the best way to truly answer these questions is to live it.
We recommend that you approach your first year of farming as a trial period. Think about your first season as a test run where you go through all the stages, steps, and processes of outplanting, growing, and harvesting on your chosen site, but you minimize your up-front capital expenditure to the best of your ability. You’ll learn as much your first year farming from growing two lines as you will twenty. And by minimizing your overhead, you’ll reduce the risk of losing a lot of money. In essence, you want to design and permit a farm, but plant a garden.
In an ideal world, every country would have a permitting process in place to allow farmers to easily lease and permit a test site to conduct these tests. In some countries, you can receive an experimental permit; a small inexpensive lease, which allow farmers to try out the industry. But unfortunately, many other countries don’t have this option, and the permitting process can be long and drawn out. In short, you don’t want to do it twice in two years. So, although you may not be growing at a full commercial scale until year two or even year three, it’s in your best interest to permit your farm for the full acreage required to operate your farm at scale, based on your calculations. Reach out to your Cool Blue Future country facilitator for more information about permitting in your country.
As you go through the rest of this course, design and plan a farm that will help you meet your business goals, but keep in mind that you don’t need to install all the gear immediately. You could permit a 3-hectare site but only install two arrays your first year. Even though you don’t plan on running your full farm in year one, you should be roughly aware of how your farm will look and how much money you stand to earn when your farm is running at scale. So, it’s a good exercise to design your fully operational farm to the best of your ability.
Kelp and mussels both use the same basic farm infrastructure to grow. But the spreader-bar design described later in this lesson is not suitable for the cultivation of mussels and oysters, as the vertical force from the sheer weight of the crops will outmatch the durability of the structure. So, if you are growing mussels or oysters, you are restricted to single-line arrays.
Single-Line Array
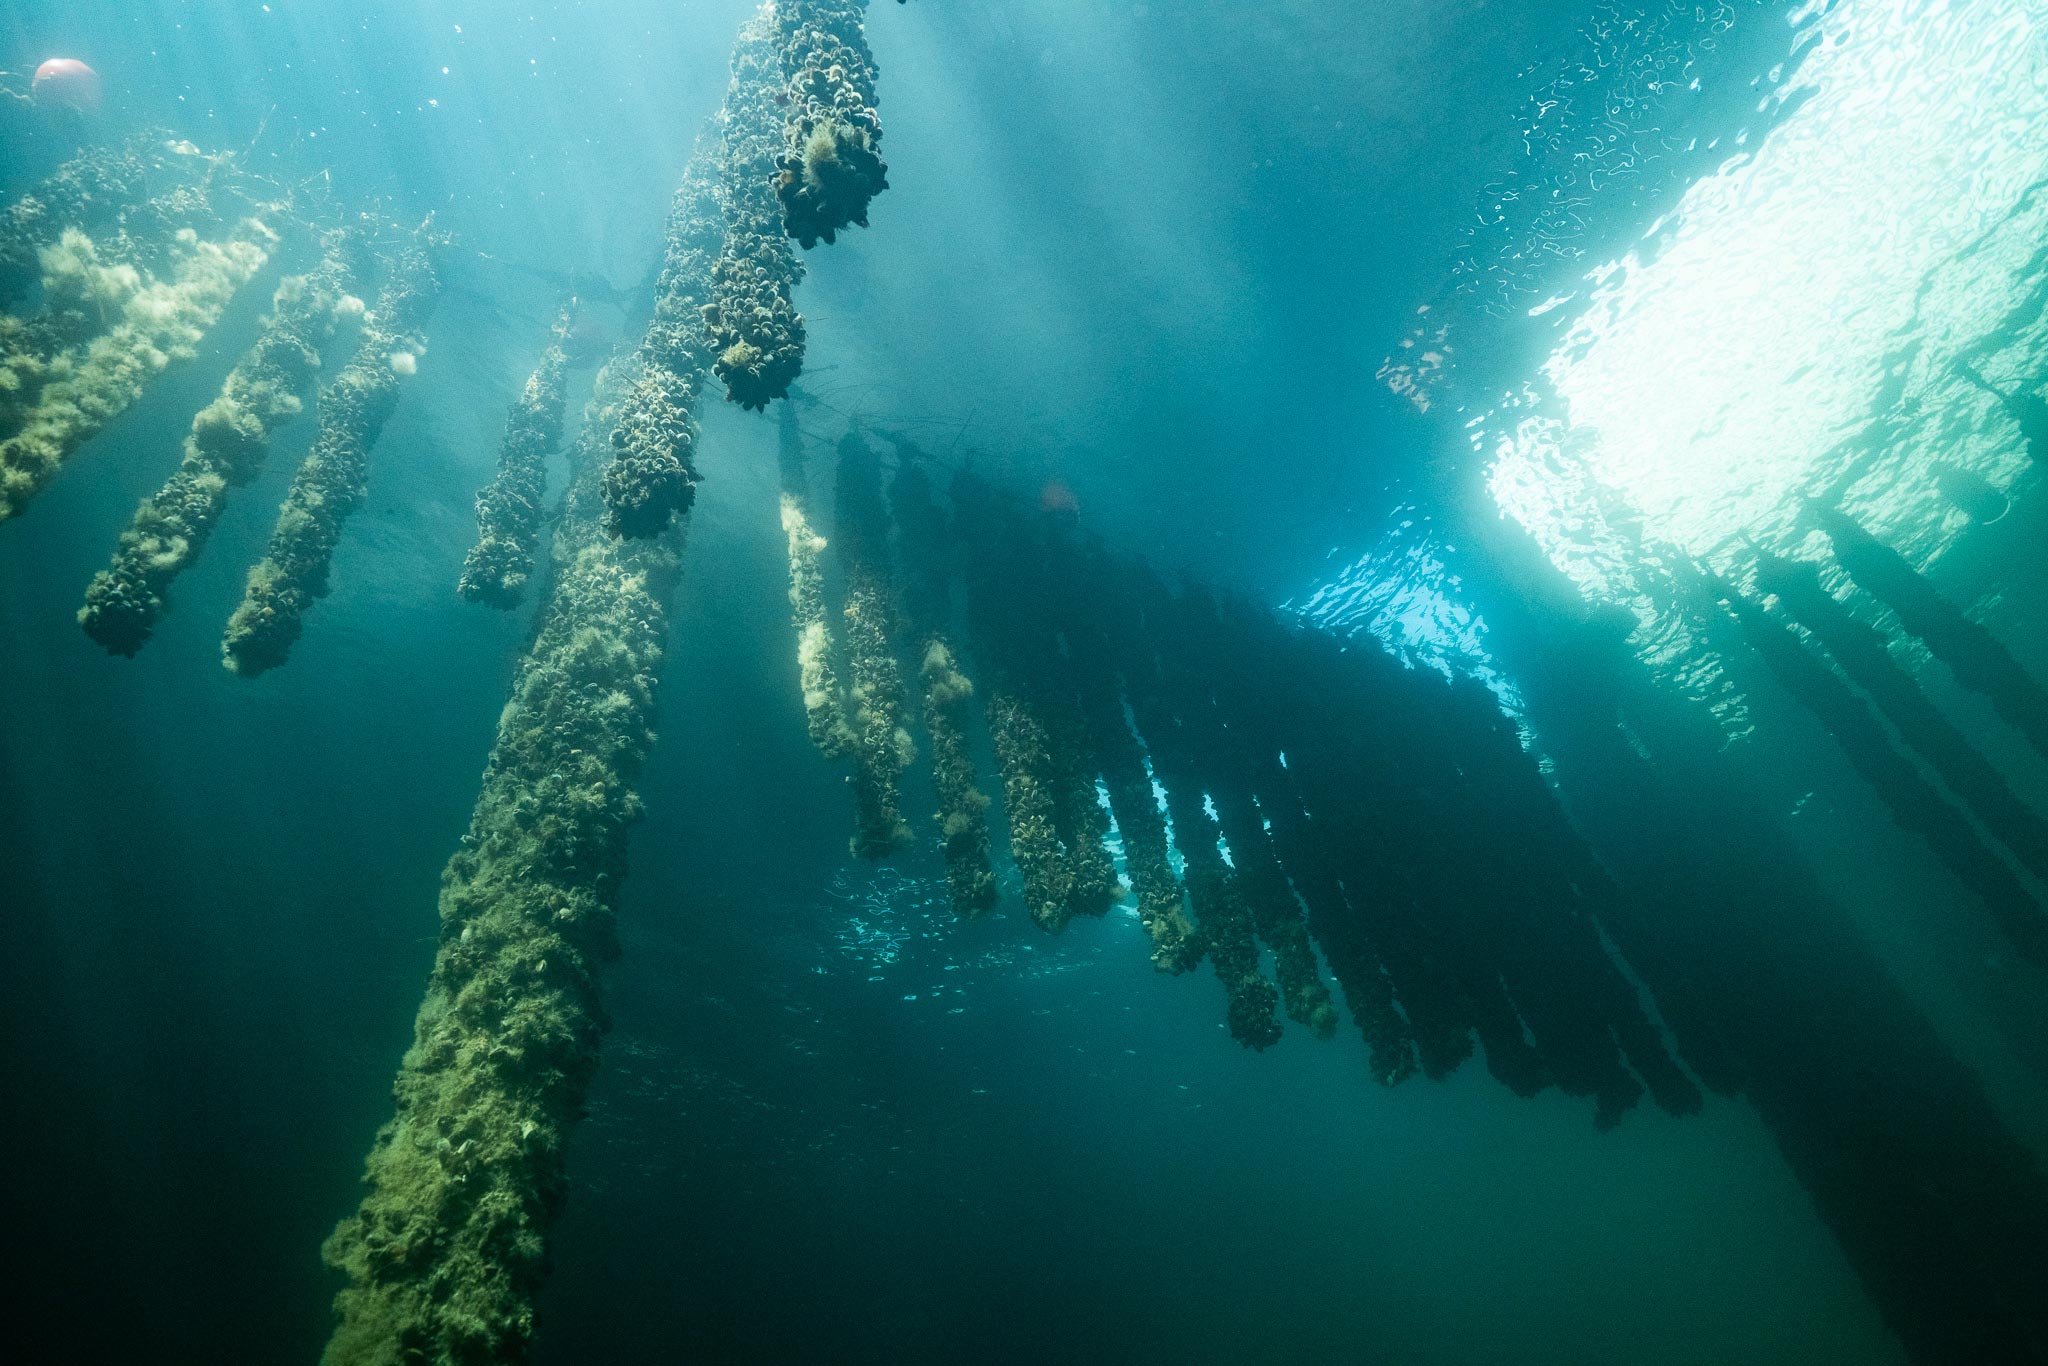
The simplest, most straightforward way to grow kelp or mussels is with a single-line array. It’s the classic, original design that farmers have been using for decades. A single, horizontal growline is submerged about one meter below the surface and attached to anchors on either end. The single-line array is the design we recommend for all first-year farmers.
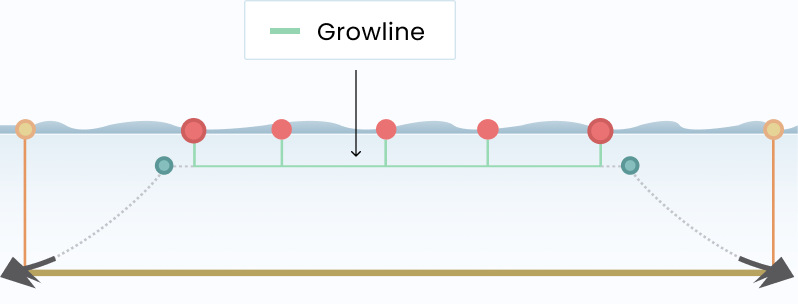
In the diagrams below, you can see both an aerial and profile view of this array design. Notice the three main components of the system: the growline, the buoys, and the anchors.


Growline
The length of line suspended horizontally in the water, where the kelp attaches as it grows. During outplanting, the growline is wrapped with seed string that contains thousands of baby sporophytes. As the kelp grows, the holdfasts come to attach directly to the growline.
When growing mussels, the mussels are hung in socks or continuous ribbons in garlands from the growline and are attached at fixed intervals. Oyster cages or nets are also hung directly on the growline down through the water column.
Buoys
The buoys on a kelp farm keep the system afloat and mark important elements of the array that are concealed underwater.
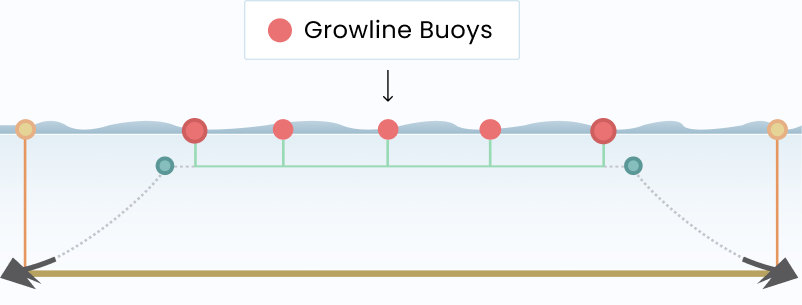
The buoys that keep the crops afloat are called the growline buoys. As your crops grows, they become heavier and heavier, eventually weighing down the growline so much that, without any flotation, it could sink to the bottom. The growline buoys counteract this force by holding the crops at the proper depth for ideal growth conditions, typically around 1-2 meters below the surface of the water. The growline buoys also provide an access point to the crops, allowing the farmer to lift the growline to the surface and inspect the crops without disturbing their growth. This diagram depicts a typical 60-meter growline with three growline buoys, attached at intervals of 15 meters.
You might find you are able to maintain enough buoyancy with fewer buoys, especially early in the season when the crops aren’t adding substantial weight to the growline. Too much buoyancy early on can cause the growlines to surface during bad weather and cause damage to your crop. After outplanting, we mark the buoy connection points with a small cork that can easily be swapped out for a buoy later in the season.
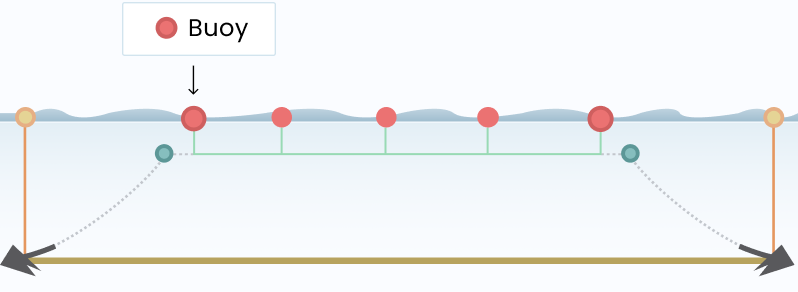
Anchor line buoys mark the connection point between the growline and the anchor line on either side of the array. Typically, the anchor line buoys are larger than the growline buoys. Some farmers also use brightly colored buoys or buoys with hazard markings (referred to as regulatory marker buoys or RMBs) to mark the perimeter of their active cultivation site.
Anchors
The anchors are what tether your array to the seafloor, hold it in place, and help maintain tension. The anchors are connected to the growline by an anchor line and, sometimes, a length of chain. Together, the segment that attaches the floating portion of the array to the anchor on the bottom is called the anchor rode.
In the diagram, you’ll notice we’ve incorporated the use of a tensioning buoy along the span of the anchor line. This small buoy raises in position in the water at low tide, helping to maintain tension on the growline as the water level fluctuates. Tag lines run from the anchor to a retrieval buoy on the surface, which helps farmers locate the anchor for retrieval or tensioning.
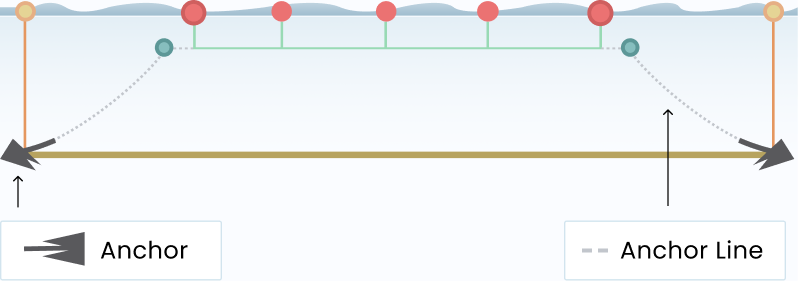
5-Line Array
The 5-line array builds on the basic design of the single-line array but incorporates the use of spreaders (or spreader bars) to hold multiple growlines in close proximity to one another within the same array system. The use of spreaders dramatically increases the number of growlines that are able to be deployed per pair of anchors and can significantly boost the growing capacity of a farm without increasing the overall site footprint.
In the diagrams, you’ll notice that the profile view of the 5-line array looks similar to that of the single-line array. The anchoring system is virtually identical, though the anchors will need to be larger due to the increased weight and drag of the additional growlines. One notable difference between the two systems, however, is that the 5-line array does not incorporate buoys spliced directly to the growline. Instead, flotation buoys are attached with a bridle to the spreaders themselves. This bridle system is the unique element of the 5-line array.


Spreader Bar
In a typical 5-line array, the spreader bar is a 3-meter long, 7,5 cm diameter aluminum pipe, with welded eyes to receive various line connections. The spreaders are located on either end of the array, and at 30-meter intervals along the growline. They hold five parallel growlines at a fixed distance apart.
Bridle
There are two bridles used in the 5-line array. A horizontal bridle is a trio of lines that runs from the spreader to a connection point with the anchor line underwater. The vertical bridle runs from either end of the spreader to a buoy on the surface creating a triangle.
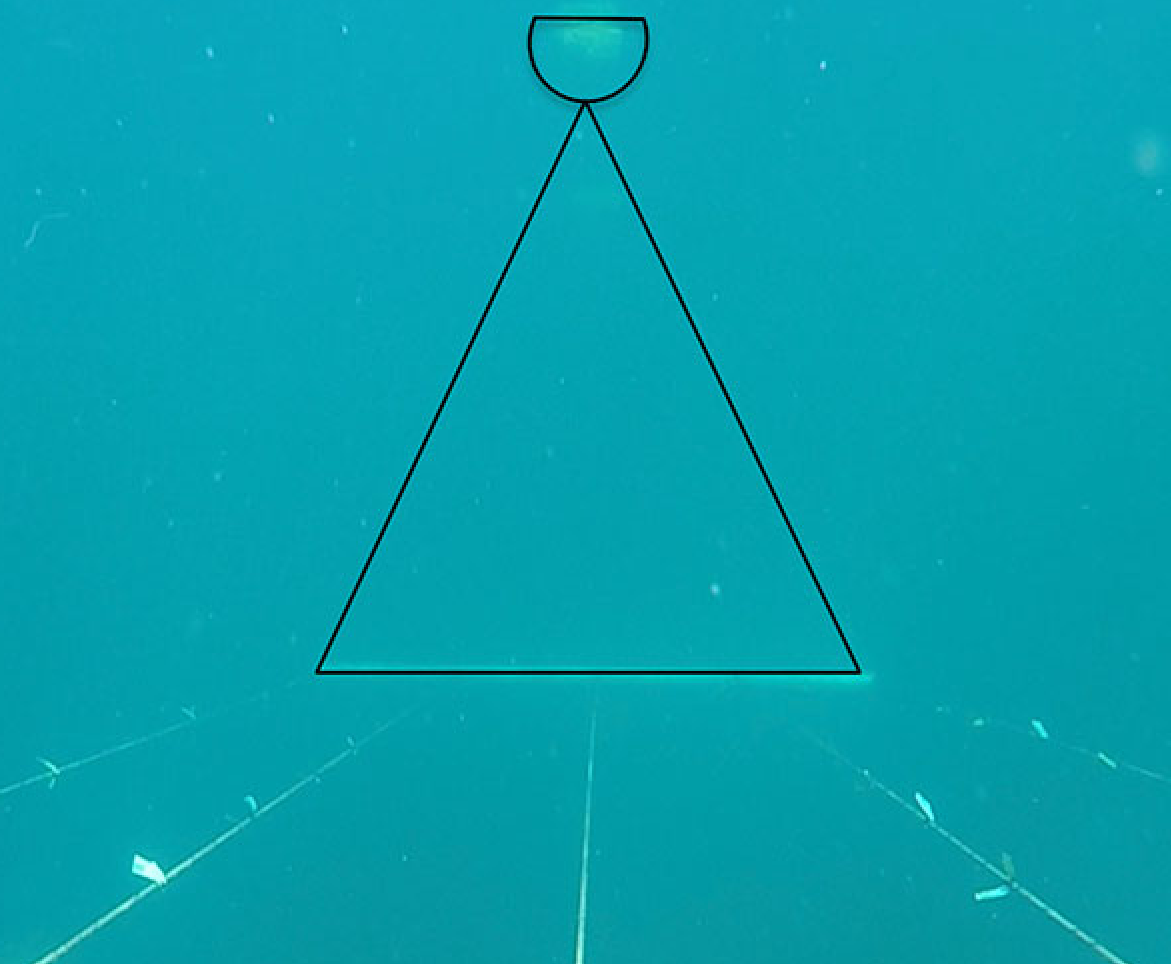
This image shows an underwater view of the buoy and bridle system at the end of a 5-line array. The sides of the black triangle delineate the bridle lines that run from either end of the spreader bar to a buoy on the surface.
The diagram above shows a 30-meter span between spreader bars, where no intermediary flotation is used. But some farms use much longer 5-line systems, in which case an intermediary spreader, called a mid-span spreader, with a buoy and bridle is used to provide flotation along the growlines. Generally, we recommend adding a mid-span spreader every 30 meter of growline.
The 5-line array is a fairly new concept, and farmers are still teasing out the best designs, including when and where additional spreaders and buoys are needed along the span of the growlines. You may need to experiment a bit to find out what works best for your site and your system. Some farmers suggest starting out with minimal flotation and adding mid-span spreaders and flotation buoys once the crop has started to grow.
Maintaining even tension throughout the 5-line system is crucial to its success and stability. This can be achieved with careful preparation and monitoring once it has been deployed. When assembling the system on land, it’s critical that the growlines are measured under tension and cut to matching lengths; otherwise, the system will hang lopsided in the water.
To ensure the whole system is held under constant tension, we recommend using drag embedment anchors, which can be adjusted once the array is in the water. Additionally, tensioning buoys and/or a length of chain along the anchor rode reduces slack on the lines during low tide.
The 5-line system is more complex than the single-line array and requires a bit of precision and finagling to get right, so we don’t typically recommend it for first-year farmers. But, again, the benefit of the 5-line is that it allows for significantly higher production without an increase in farm footprint.
Catenary Array
The most complex array type is the multi-line catenary, or simply, the catenary array. Unlike the single-line and 5-line arrays which have two anchor points, the catenary array uses fewer but larger anchors to secure the corners of a matrix of closely spaced growlines. On either end of the array, a curved horizontal line, called a catenary framing line, is used to secure the growlines to the anchor system. Catenary arrays have been designed with as many as 55 individual growlines, spaced only a couple of feet apart.
We have included this array type to give you a visual of the full range of farm designs for ocean farming, but we do not recommend the use of this design for first-time farmers. It requires significant marine engineering expertise to design and install correctly, as well as substantially larger gear and equipment.
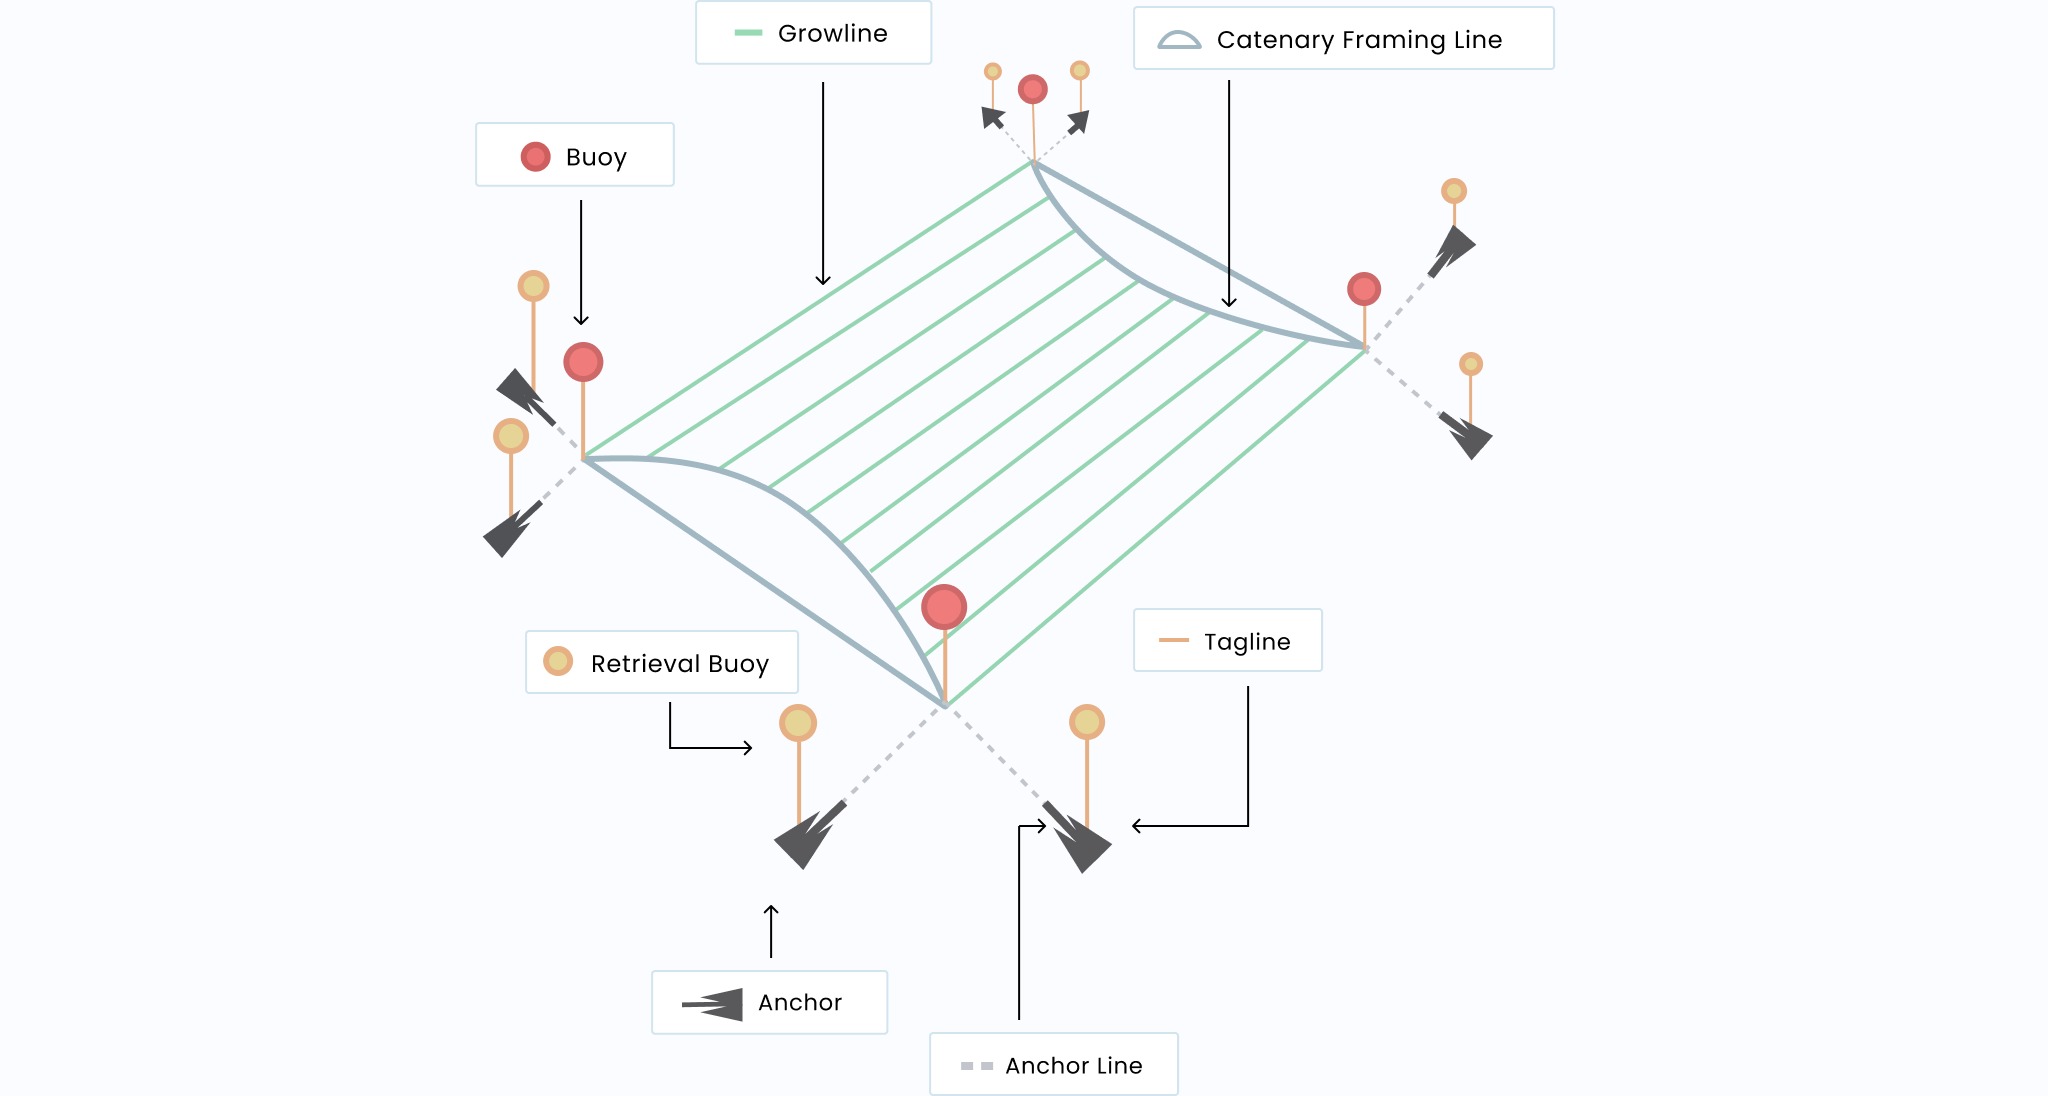
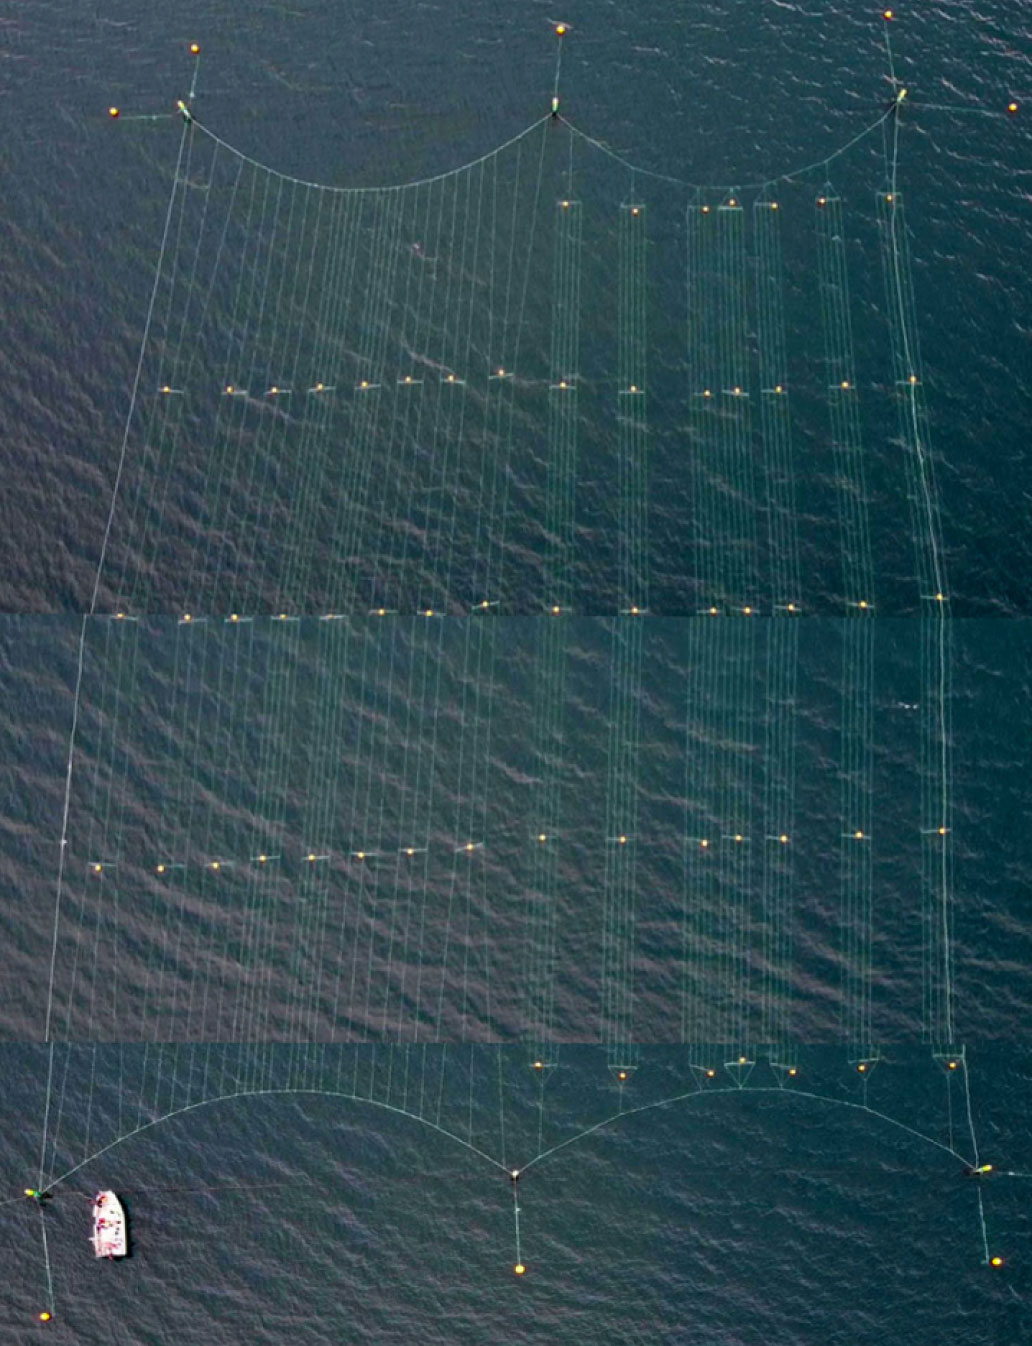
The benefit of the catenary array is that it allows for much more densely packed growlines than other array types. The trade-off is that the anchors it requires are much larger than those needed for single-line and 5-line arrays. Similarly, there are fewer but larger buoys used to maintain proper buoyancy of the system.
Proper and consistent tensioning is critical to this design. When laying out the system, each growline must be stretched (or pretensioned) with the same force before measuring and cutting it to length. When the lines are cut, assembled, and tensioned properly, the growlines will maintain their parallel positions, and the array will lay evenly in the water.
Due to the curved shape of the catenary framing line, it’s possible to maximize the growing area of the array by cutting each growline to a different length. However, this can sometimes lead to confusion, as it’s easy to get lines mixed up. Another solution is to cut all the growlines to equal length and have different length extension lines that connect the growlines to the catenary framing lines on either end. Either way, there is quite a bit of math that needs to be done to figure out the length to which each segment should be cut to maintain the proper shape of the catenary framing line.
We want to reiterate that this is a highly advanced design concept. Many farmers using the catenary system hire an engineer to help them with the design process. We do not recommend it for first-time farmers. If you’re considering a catenary array for your site and you’re not an engineer, we recommend that you hire one to steer you in the right direction.
It should also be noted that not every site can support a large-scale array, even with a large enough lease site. The catenary array can produce several hundred thousand pounds of biomass on a single site, and many areas don’t have enough nutrients in the water to support that level of crops. You should have a good understanding of the nutrients in your area—not to mention an established market for your produce—prior to investing in such a large and complex array.
The Farm Design tool
GreenWave has developed a nice online tool for designing your ocean farm. It’s free and available as part of GreenWave’s Ocean Farming Hub. You do need to set up a profile with GreenWave to use the tool, but we highly recommend doing this as part of your journey towards regenerative ocean farming.
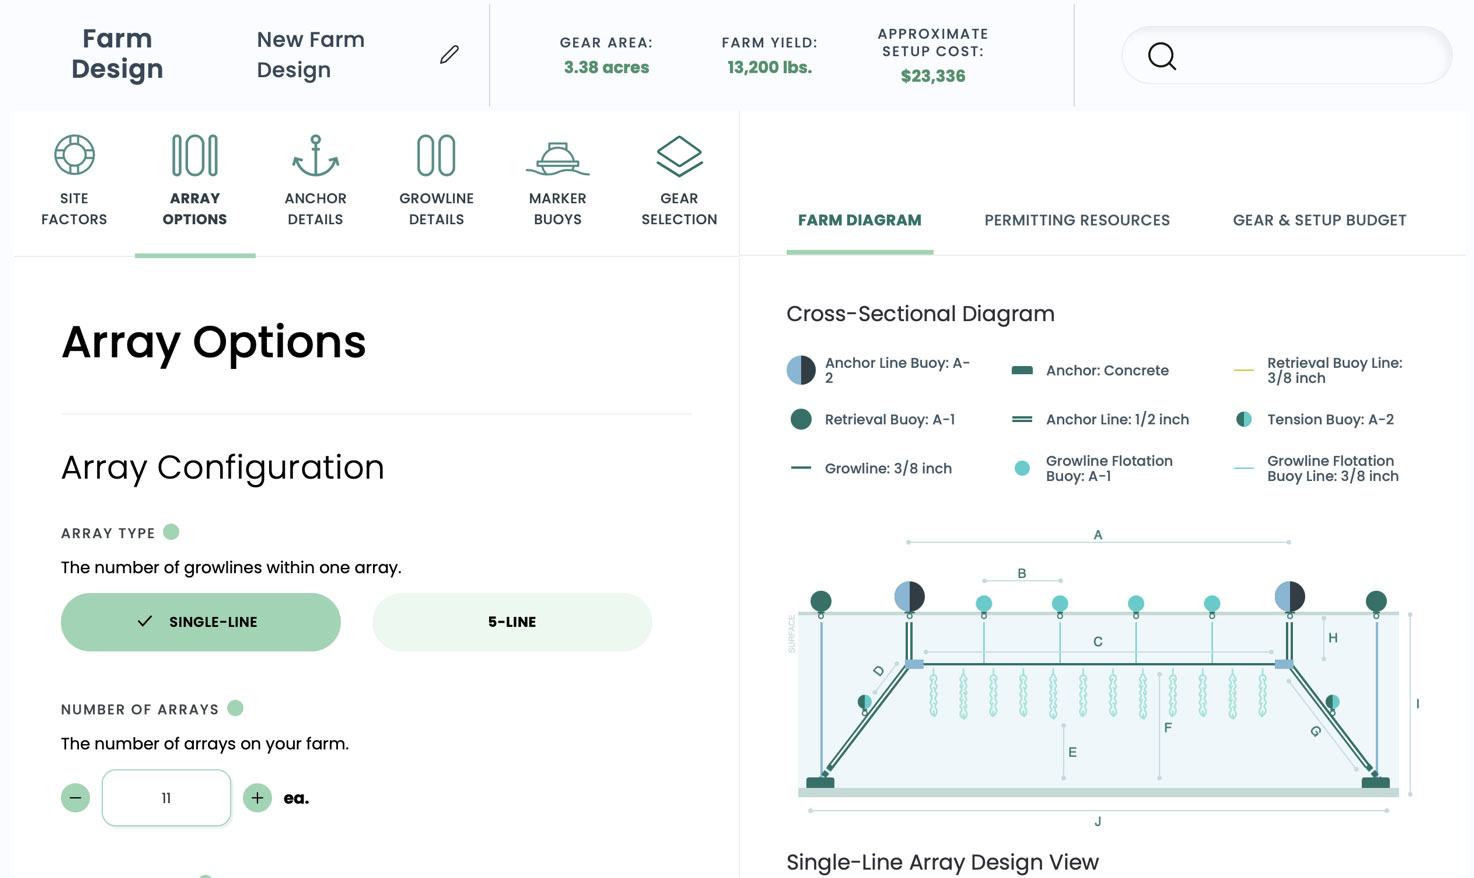
Farming the ocean means navigating hundreds of unseen factors to support a floating system of lines and buoys. Every farm is different because all designs must ultimately be site-specific. Localized forces such as the current speed and direction, the exposure of your site, even the nutrient availability in the water, which influences the ultimate biomass of your kelp—all these factors will impact the drag on your system. The drag, in turn, dictates the size of your anchor, which impacts your lease area and your eventual startup costs.
When you’re just starting out, it can be overwhelming to try and keep all these different factors and impacts straight. For years, GreenWave has watched farmers in the US struggle with these complicated calculations, wishing there was an easier way. That’s why they built the Farm Design Tool: to do the math for you, so you can make the big-picture choices of how to ultimately construct and operate your farm.
GreenWave recommend that you use the Farm Design Tool early and often throughout your farm startup journey. First, use the Tool to learn. Get to know how site depth impacts lease size, how current changes anchor size, and how all these factors ultimately impact cost. Manipulate these variables to inform your thinking as you’re deciding what type of farm system to pursue. Then, use the Tool again as a planning resource when you’ve chosen a site and want to narrow in on the details.
The Farm Design Tool is a modeling tool built on a series of assumptions that inform the calculations behind the scenes. It isn’t perfect; there are some limitations. You should be aware of these assumptions and know that you’ll likely need to make some modifications to your design to suit the particulars of your site. Before you finalize your farm plans or make any major financial investment in your farm gear, you might want to verify your designs with a marine engineer.
